Hibernate ( XML mapping ) - 1st Program
First Hibernate Program - XML mapping
This
lesson shows the basic steps of creating a simple hibernate
application by using eclipse IDE.
Step
1 - Setup the development environment for Hibernate
Step
2 - Setup the database
Step
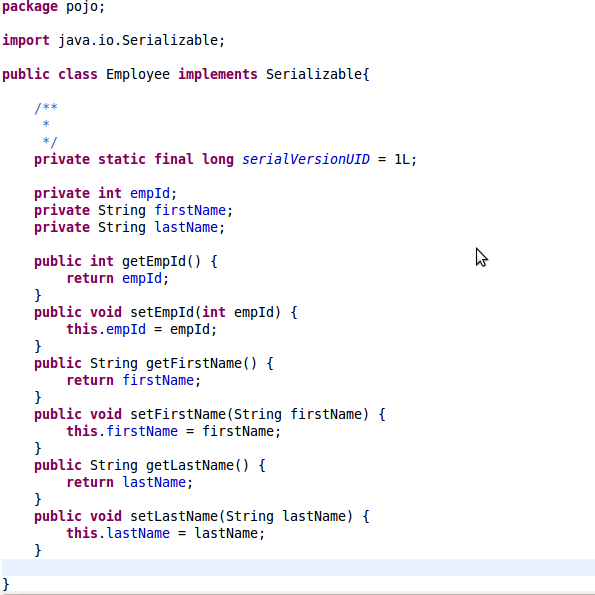
3 - Create POJO class ( Employee.java )
Step
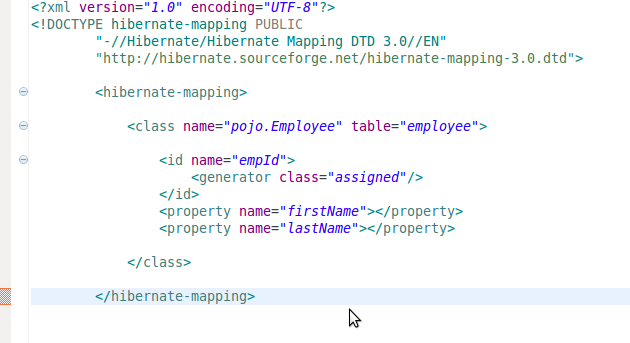
4 - Create respective mapping file ( hbm.xml )
Step
5 - Hibernate Configurations (
hibernate.cfg.xml )
Step
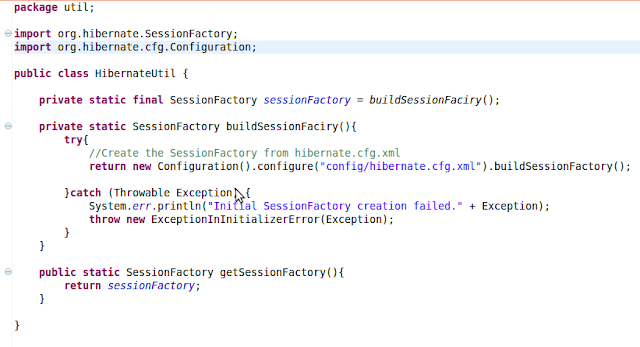
6 - Create Helper class ( HibernateUtil.java )
Step 7 - Create class to do the execution ( ExecuteEmployee.java )
Step
1 - Setup the development environment for Hibernate
To
set up the development environment you need to carry out below
operations.
(Assume
you already install Java to your development environment and as well
as you familiar with the eclipse IDE.)
Step 1.1 - Create new a Java project “BasicHibernateApplication”
Step
1.2 - Add JDBC Driver for MySQL
For
this application used MySQL as the database application. Therefore
need to add the “mysql- connector-java-5.1.18-bin.jar” JDBC
driver jar.
Create a new folder (ex: “DriverLib”) under your project and copy above file into that folder. Once you copied it, then you need to configure it on the build path. For that use below steps.
i)
Right click the project
ii)
Select Build Path
iii)
Configure Build Path
iv)
Go to Libraries tab and browse and add the jar file.
Step
1.3 - Add Hibernate Prerequisites
Following
is the list of packages/libraries required to develop hibernate
application.
For use annotation, it uses
* ejb3-persistence.jar
* hibernate-annotations.jar
* hibernate-commons-annotations.jar
Create
a new lib folder under your project and copy above files into the lib
folder. Once you copy the files


then
you need to configure the build path. For that use below steps.
i)
Right click the project
ii)
Select Build Path
iii)
Configure Build Path
iv)
Go to Libraries tab and browse and add all jar files
Step 2 - Setup the database
For
this example I use MySQL database and my database name is
“myworkspace” and create a table employee.
The primary key is empid.

Step
3 - Create POJO class
Create
a POJO (Plain Old Java Object) class that represents the employee.
This is a simple class which has property getter and setter methods
and private visibility for the fields.

Step
4 - Create respective mapping file
Hibernate
mappings which used to know how to load and store objects of the
persistent class.
The mapping file tells Hibernate what is the table and what are the columns in that table in order to carry on the operations.
The mapping file tells Hibernate what is the table and what are the columns in that table in order to carry on the operations.
Create
a mapping file “employee.hbm.xml” which maps “Employee.java”
POJO and the “employee” table in the database.

Step
5 - Hibernate Configurations
Next
step is configure Hibernate.
This shows hibernate how to obtain and
manage the connections with the database.
To
create the configuration file, right click on the “src" folder
and select New --> File. Now specify the configuration file name
as hibernate.cfg.xml and save it.

hibernate.connection.url
– Give
the database connection url.
hibernate.connection.username
– Give
the database user name.
hibernate.connection.password
– Give
the database password if exists.
hibernate.connection.driver_class
– Give
the appropriate driver class according to the database which is using
your application.
<mapping
resource="hbm/employee.hbm.xml"/>
- This is the mapping hbm file.
Step
6 - Create Helper class
Startup
Hibernate by creating a thread-safe, global
org.hibernate.SessionFactory object and this object is instantiated
once. A org.hibernate.SessionFactory is used to obtain an instance
of org.hibernate.Session this represents a single-threaded unit of
work.
Create
a HibernateUtil helper class that takes care of startup and makes
accessing the org.hibernate.SessionFactory more convenient.

Step
7 - Create
class to do the execution
Create
a class ( ExecuteEmployee.java
)
to illustrate how we can Insert, Retrieve, Update and Delete data in
a MySQL database.


Out
put on the above application as follows.

